
Apple App Store
Publish Your Median iOS App to the App Store
Median supports self-service iOS publishing directly from App Studio. The recommended workflow is to connect your Apple Developer account through the App Store Connect API, set Upload to App Store Connect to Automatic, build a distribution IPA, test the build in TestFlight, and then submit it for App Review in App Store Connect. You do not need a Mac, Xcode, or Apple Transporter for this standard workflow.
Developers who prefer a local native workflow can still download the complete iOS source code and publish with Apple development tools. Median also offers configuration, consulting, and publishing services. If you would like assistance with publishing, please contact us.
Apple Developer Account
To publish an app on the Apple App Store, you must have an active Apple Developer account.
You can enroll in the Apple Developer Program here: https://developer.apple.com/programs/enroll/.
Individual vs. Organization Apple Developer Accounts
When enrolling in the Apple Developer Program, you must choose between an Individual account or an Organization account. The appropriate choice depends on how your app will be owned, managed, and published.
Both account types allow you to publish apps to the App Store, but they differ in branding, account management, and verification requirements.
Looking to upgrade your account?If you’d like to update your membership from an individual to an organization, Apple requires you to submit a request. You’ll need to be the founder/cofounder of the organization and provide details such as your organization’s D-U-N-S Number and may be asked to submit business documents to verify your organization’s identity.
Organization Account
An Organization Apple Developer account is designed for companies, startups, and teams that want to distribute apps under a business name. With this account type, the organization’s name appears as the seller on the App Store instead of an individual developer's name.
Organization accounts support team-based development by allowing multiple users to access the account through role-based permissions. The following roles are available for you when managing the app:
- Account Holder: Legal owner. Signs contracts, renews membership.
- Admin: Manages users, certificates, profiles, and submissions.
- Developer: Creates certificates & profiles, registers devices, signs apps.
- App Manager: Creates apps, uploads builds, manages TestFlight.
- Marketing: Updates screenshots, descriptions, views analytics.
Because the account represents a legal business entity, Apple requires additional verification during enrollment. Organizations must provide company information and a D-U-N-S® Number, which Apple uses to confirm the organization’s identity.
Individual Account
An Individual Apple Developer account is intended for a single developer who wants to publish apps under their personal identity. When you publish an app using this account type, your personal name appears as the seller on the App Store listing rather than a company name.
This account type is designed primarily for independent developers and personal projects. It provides the ability to build, sign, and publish apps, but it offers limited support for team collaboration. Typically, the account is managed by a single account holder with full administrative access.
Individual accounts are generally faster to set up because Apple does not require business verification. This makes them a good option for developers who are experimenting with app development, building side projects, or publishing apps independently.
Which Should You Choose?
For most business apps, an Organization account is recommended because it allows team management and displays your company name in the App Store.
If you are building a personal project or experimenting with app development, an Individual account may be sufficient.
If you plan to transfer ownership to a company later, migrating from an Individual account to an Organization account can require additional steps, so consider your long-term publishing needs before enrolling.
iOS Bundle ID
The Bundle ID uniquely identifies your application within the Apple ecosystem. It connects your app to the provisioning profiles and signing certificates in your Apple Developer account.
The Bundle ID is not visible to end users. Apple recommends using reverse domain name notation.
For example, if your website is example.com, your recommended Bundle ID is com.example.app.
Choose a Bundle ID that is unique and consistent with your organization's naming conventions.
Signing Certificates
After creating your Apple Developer account, your app must be signed with Apple certificates and provisioning profiles before it can be tested or submitted.
The recommended approach is to connect Median App Studio to your Apple Developer account through the App Store Connect API. Median can then generate and manage the required signing certificates and provisioning profiles for you, and upload distribution builds directly to App Store Connect.
Manual certificate setup is only needed if you choose not to use the App Store Connect API integration or if you build from source locally in Xcode.
For detailed instructions, see Apple’s documentation: Maintaining Your Signing Identities and Certificates.
App Store Connect App Store Listing
Create your app store listing at App Store Connect. You need this app record before a build can appear in TestFlight or be submitted for review. You'll need to fill out several pieces of information including app name, description, search keywords, screenshots for the various devices sizes, content rating, contact person and a few more.
Once your listing is complete, select the build you want to submit. If no build is available yet, follow the steps in the Uploading Your Build section below.
App Store Screenshot Requirements
Apple supports screenshots for several device sizes. With the introduction of Media Manager in App Store Connect, you can upload screenshots for the largest device sizes, and Apple will automatically scale them for smaller devices.
For a complete list of supported screenshot sizes, see: Apple's Screenshot specifications.
App Store Screenshot TemplatesMedian provides a collection of 500+ free screenshot templates for Android and iOS apps. These templates support a variety of design styles and branding requirements.
Browse and download the templates here: App store screenshot templates
Screenshot File Requirements
Screenshots must meet the following specifications:
- 72 DPI
- RGB color space
- Flattened images (no layers)
- No transparency
- High-quality JPEG or PNG format
Screenshot sizes for iPhone
| Device size | Possible screenshot size options |
|---|---|
| 6.9-inch iPhone 16 Pro Max iPhone 16 Plus iPhone 15 Pro Max iPhone 15 Plus iPhone 14 Pro Max | 1290 x 2796 pixels (portrait) 2796 x 1290 pixels (landscape) 1320 x 2868 pixels (portrait) 2868 x 1320 pixels (landscape) |
Screenshot sizes for iPad
By default, all Median apps are universal meaning they run on all iOS and iPadOS devices. Therefore you need to provide and upload iPad screenshots.
| Device size | Possible screenshot size options |
|---|---|
| 13-inch iPad Pro (M4) iPad Pro (6th generation, 5th generation, 4th generation, 3rd generation, 1st generation) iPad Air (M2) | 2064 x 2752 pixels (portrait) 2752 x 2064 pixels (landscape) 2048 x 2732 pixels (portrait) 2732 x 2048 pixels (landscape) |
Uploading Your Build
Recommended: App Store Connect Upload from Median App Studio
For most developers, the fastest path is to upload from Median App Studio through the App Store Connect API.
- In App Store Connect, create the app record for your Bundle ID.
- In Median App Studio, open Build & Deploy and configure the iOS IPA build.
- Connect your Apple Developer account with an App Store Connect API key.
- Select a distribution provisioning profile and set Upload to App Store Connect to Automatic.
- Build the iOS IPA.
Each new distribution build is uploaded to App Store Connect automatically. After Apple finishes processing the build, it appears in App Store Connect where you can add it to TestFlight for internal testing, invite testers, and then select it for App Review.
For setup details, see Connecting Median with App Store Connect and Upload iOS to TestFlight.
Manual Alternatives
If you prefer to manage uploads yourself, leave Upload to App Store Connect set to Manual and press the Upload button after the build completes. You can also build a signed IPA in Median App Studio and upload it with Apple Transporter, or download the complete iOS source code from your Median app's manage page, open <yourapp>.xcworkspace in the latest non-beta version of Xcode, archive the app, and upload the archive from Xcode.
Once your build is selected, and all your App Store listing data is filled out, you may click the "Submit for Review" button in the top right. On the next page, you may be asked questions about Cryptography, the Advertising Identifier, and 3rd Party Content. Median apps DO use Cryptography, but fall under the exception for standard user authentication. Median does NOT use the Advertising Identifier. You will have to determine for yourself if your app uses 3rd party content, and if you have the rights to it.
Frequently Asked Questions
Can I turn off iPad support?
Can I turn off iPad support?
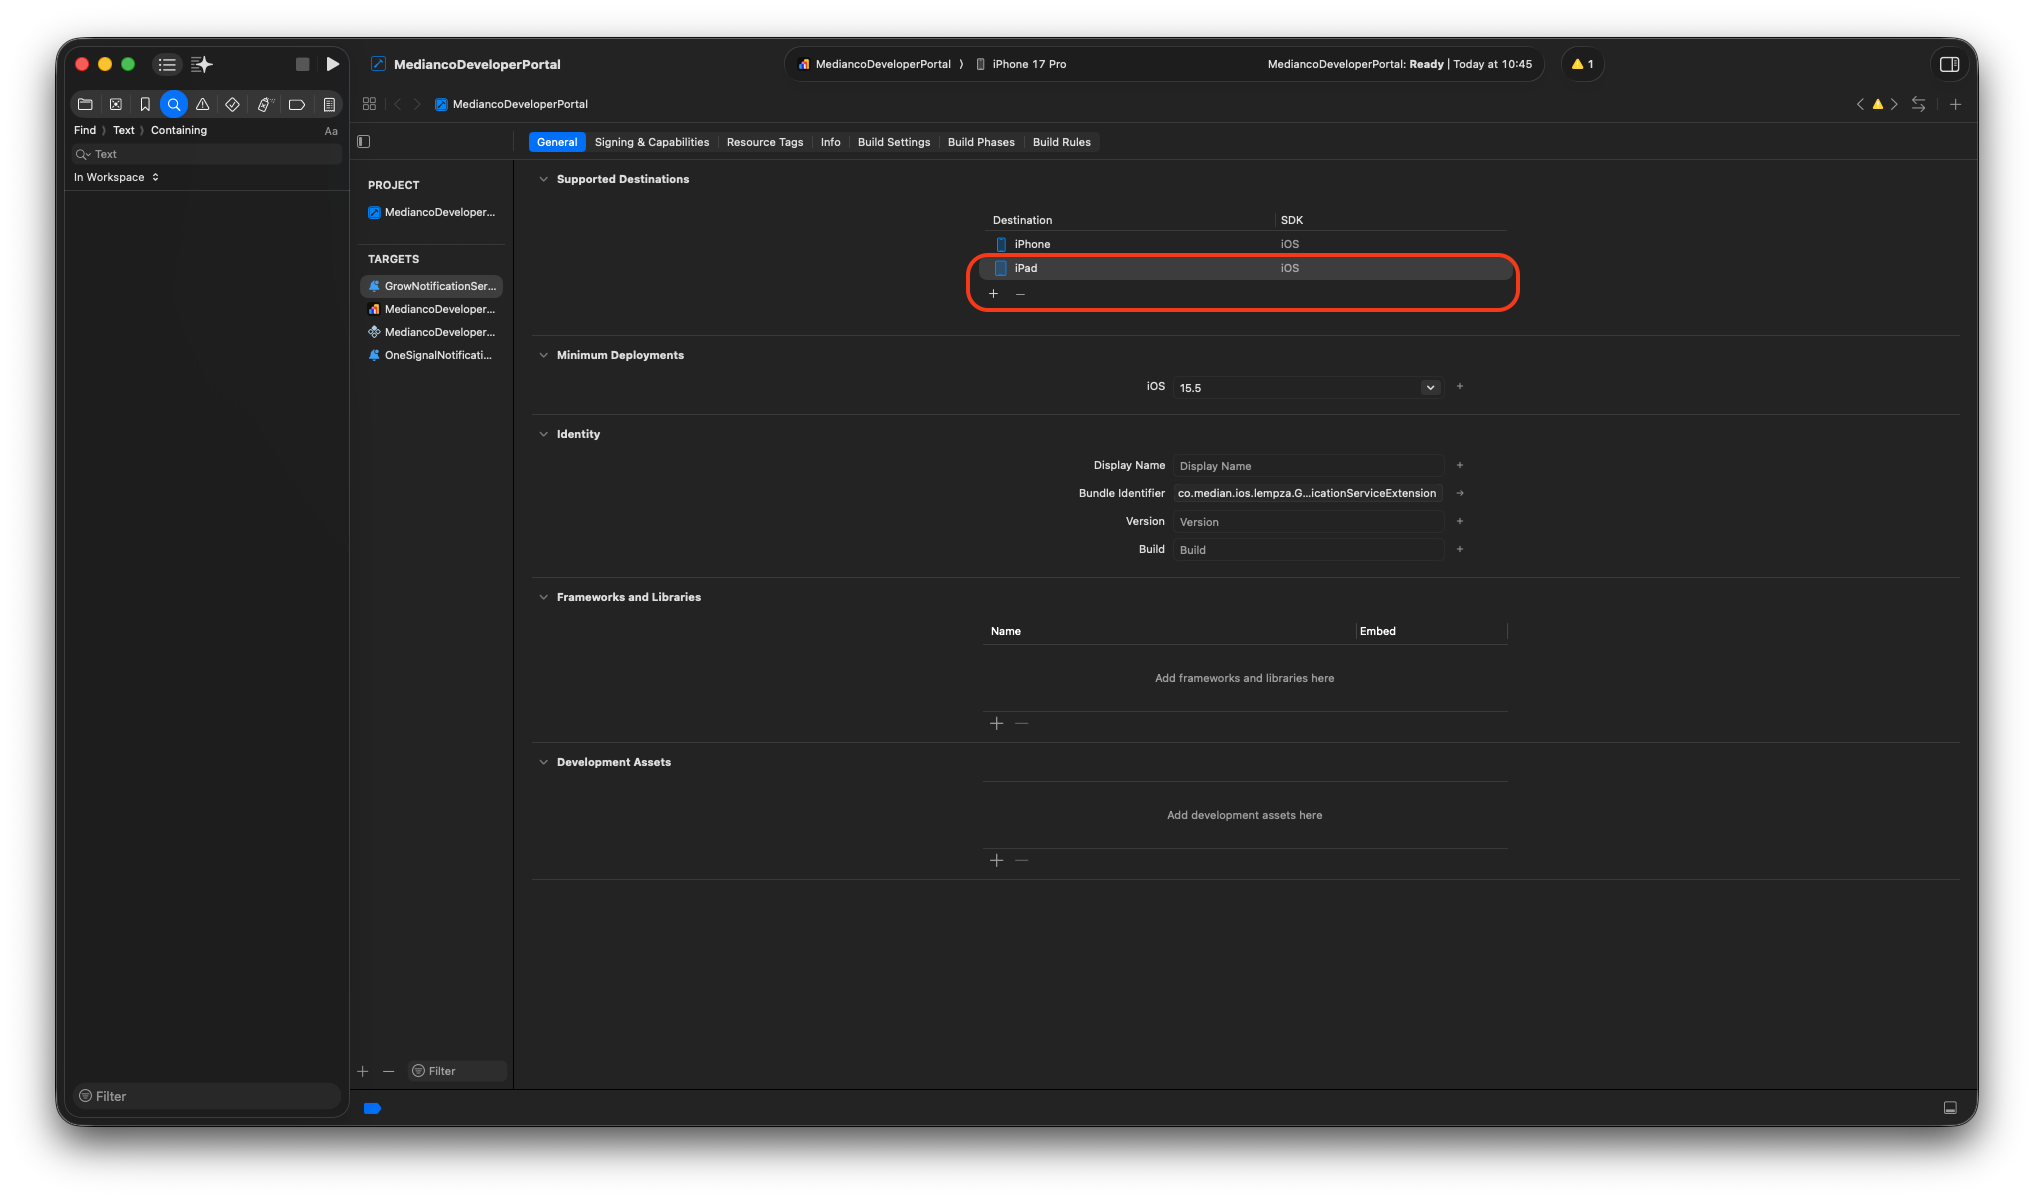
Yes. Please note that iPhone only apps will run on an iPad in a phone-sized view. It is worth putting in some effort to make your app work on iPads in that mode even if you don't want to support iPads natively.
To disable iPad support you can exclude iPad as a destination in Xcode as shown in the image below.
Updated 4 months ago