
Getting Started With Replit
This guide walks you through building a mobile-first todo list application in Replit from scratch, then converting it to a native mobile app with Median.
We'll build the complete app using Replit, then add native mobile features like push notifications and haptic feedback. We provide example prompts at every step so you can follow along or adapt them for your own projects.
What we'll build:
- A responsive to-do list web app using Replit
- Push notifications when tasks are assigned or due
- Haptic feedback when completing or deleting tasks
- A native iOS and Android app powered by Median.co
Why a to-do list?
It's simple enough to build quickly but complex enough to showcase real native features. The patterns you learn apply to any mobile app, from productivity tools to social networks. By the end, you'll have a working example and the confidence to build your own mobile apps using the same approach.
Build your own app instead
Since Lovable uses tokens or credits when building apps, you might prefer to use similar prompts to build an app of your own choice rather than following this exact to-do app example. The prompts and patterns in this guide work for any mobile app; just adapt them to your project. Feel free to substitute your own app idea and customize the prompts accordingly.
Step 1: Build your to-do app
Let's start by building your to-do list app in Replit. Open a new Replit project and use Replit Agent to create your mobile-first to-do application.
Build a mobile-first web application to-do list. Add authentication for signup and sign in (including Apple, Google and Facebook sign-in) and add a backend that stores the user data along with their to-dos. The to-do app should have functions to add, edit and remove to-dos and each to-do needs to have a title, description, priority (high, med, low) and a deadline (time).What this prompt does:
- Creates a mobile-responsive to-do list interface
- Sets up user authentication with multiple sign-in options (email, Apple, Google, Facebook)
- Configures a database backend to store user data and to-dos
- Implements CRUD operations (create, read, update, delete) for to-dos
- Adds to-do properties: title, description, priority levels, and deadlines
After running the prompt:
Replit Agent will generate your complete to-do app with authentication and database setup. You should see:
- A login/signup page with social authentication options
- A main to-do list view
- Forms to add and edit to-dos
- To-do items displaying title, description, priority, and deadline
- Delete functionality for to-dos
Next: once your app is built and deployed, you're ready to convert it to a native mobile app with our platform.
Step 2: Get your Replit app URL
The first step in your mobile app journey is simple: we need to tell Median.co where to find your web application. This requires your Replit app's public URL, the link that allows anyone on the internet to view your app.
- Deploy your app: Make sure your app is running. Replit automatically generates a public URL when your app is active.
- Locate the deployment URL: Look for the URL at the top of your Replit interface in the "Webview" panel. It will look like
https://your-repl-name.your-username.repl.co. - Copy the URL: Save this URL; you'll paste it into the Median App Studio in the next step to begin the conversion process.
Important requirementsYour Replit app must be deployed and publicly accessible for Median.co to analyze and convert it. Make sure your Repl is running and the URL loads without requiring authentication.
Quick check: test your URL by opening it in a private/incognito browser window. If you can see your app without logging in, you're ready to proceed.
Note: Replit apps go to sleep when inactive. For production apps, consider upgrading to a paid Replit plan for always-on deployments, or use Replit's deployment options to ensure your app stays accessible.
Step 3: Create your app in Median App Studio
- Access the Studio: Visit https://median.co/login or click "Sign In" via the navigation bar.
- Initialize your project: Click the Create a New App button to start your mobile app project.
- Connect your Replit app: Paste the Replit app URL you copied in the previous step. This tells us where to find your web application.
Once you hit enter, our platform springs into action, automatically analyzing your site's structure, detecting mobile compatibility features, and generating a real-time preview across multiple device simulators. You'll instantly see how your Replit app will look and behave on actual iOS and Android devices.
Step 4: Configure basic app settings
You can completely customize your app. In the App Studio, navigate through the sidebar tabs:
- App name: Set the name that will appear under your app icon.
- Branding: Upload your app icon (what users see on their home screen) and splash screen (what users see when the app opens).
- Navigation: Configure native UI elements like a top navigation bar or a tab menu. These complement your web content and make your app feel truly native.
Step 5: Install the Median JavaScript Bridge
To add native mobile features like push notifications and haptic feedback, you'll need the Median JavaScript Bridge. This powerful API connects your web app to native device features.
Why this matters
While your web app will work perfectly fine with our conversion, adding native features creates an experience that rivals apps built specifically for mobile platforms. Think haptic feedback when users tap buttons, access to the device camera for profile photos, or push notifications that keep users engaged.
Adding the JavaScript Bridge
- Open your Replit project: Navigate to the project you want to enhance with native features.
- Access Replit Agent: Open Replit's AI assistant.
- Install the JavaScript Bridge: Use this simple prompt to add the Median JavaScript library to your project:
Please add the Median JavaScript library to this project. I plan to use Median.co to convert this web app into iOS and Android Mobile Apps. Install the median-js-bridge npm package and import it in the appropriate files.Replit Agent will install the median-js-bridge package and add the necessary imports to your code. You can verify this by checking your package.json file in the file explorer.
Step 6: Configure npm package settings in App Studio
After the AI installs the median-js-bridge package, you must update your settings in the Median App Studio to prevent conflicts.
Why this matters: By default, the Median App Studio automatically injects the JavaScript Bridge into your app. However, since you've now added it as an npm package in your Lovable project, the bridge will be included in your web app's code. Having both would cause conflicts.
What to do:
- Log in to the Median App Studio.
- Navigate to your app and click Web Overrides.
- Navigate to the JavaScript Frameworks and NPM section and select Enable from the dropdown list.
- Save your changes.
This tells Median: "Don't inject the JavaScript Bridge — my web app already includes it via NPM."
For detailed configuration instructions, see our NPM Package Documentation.
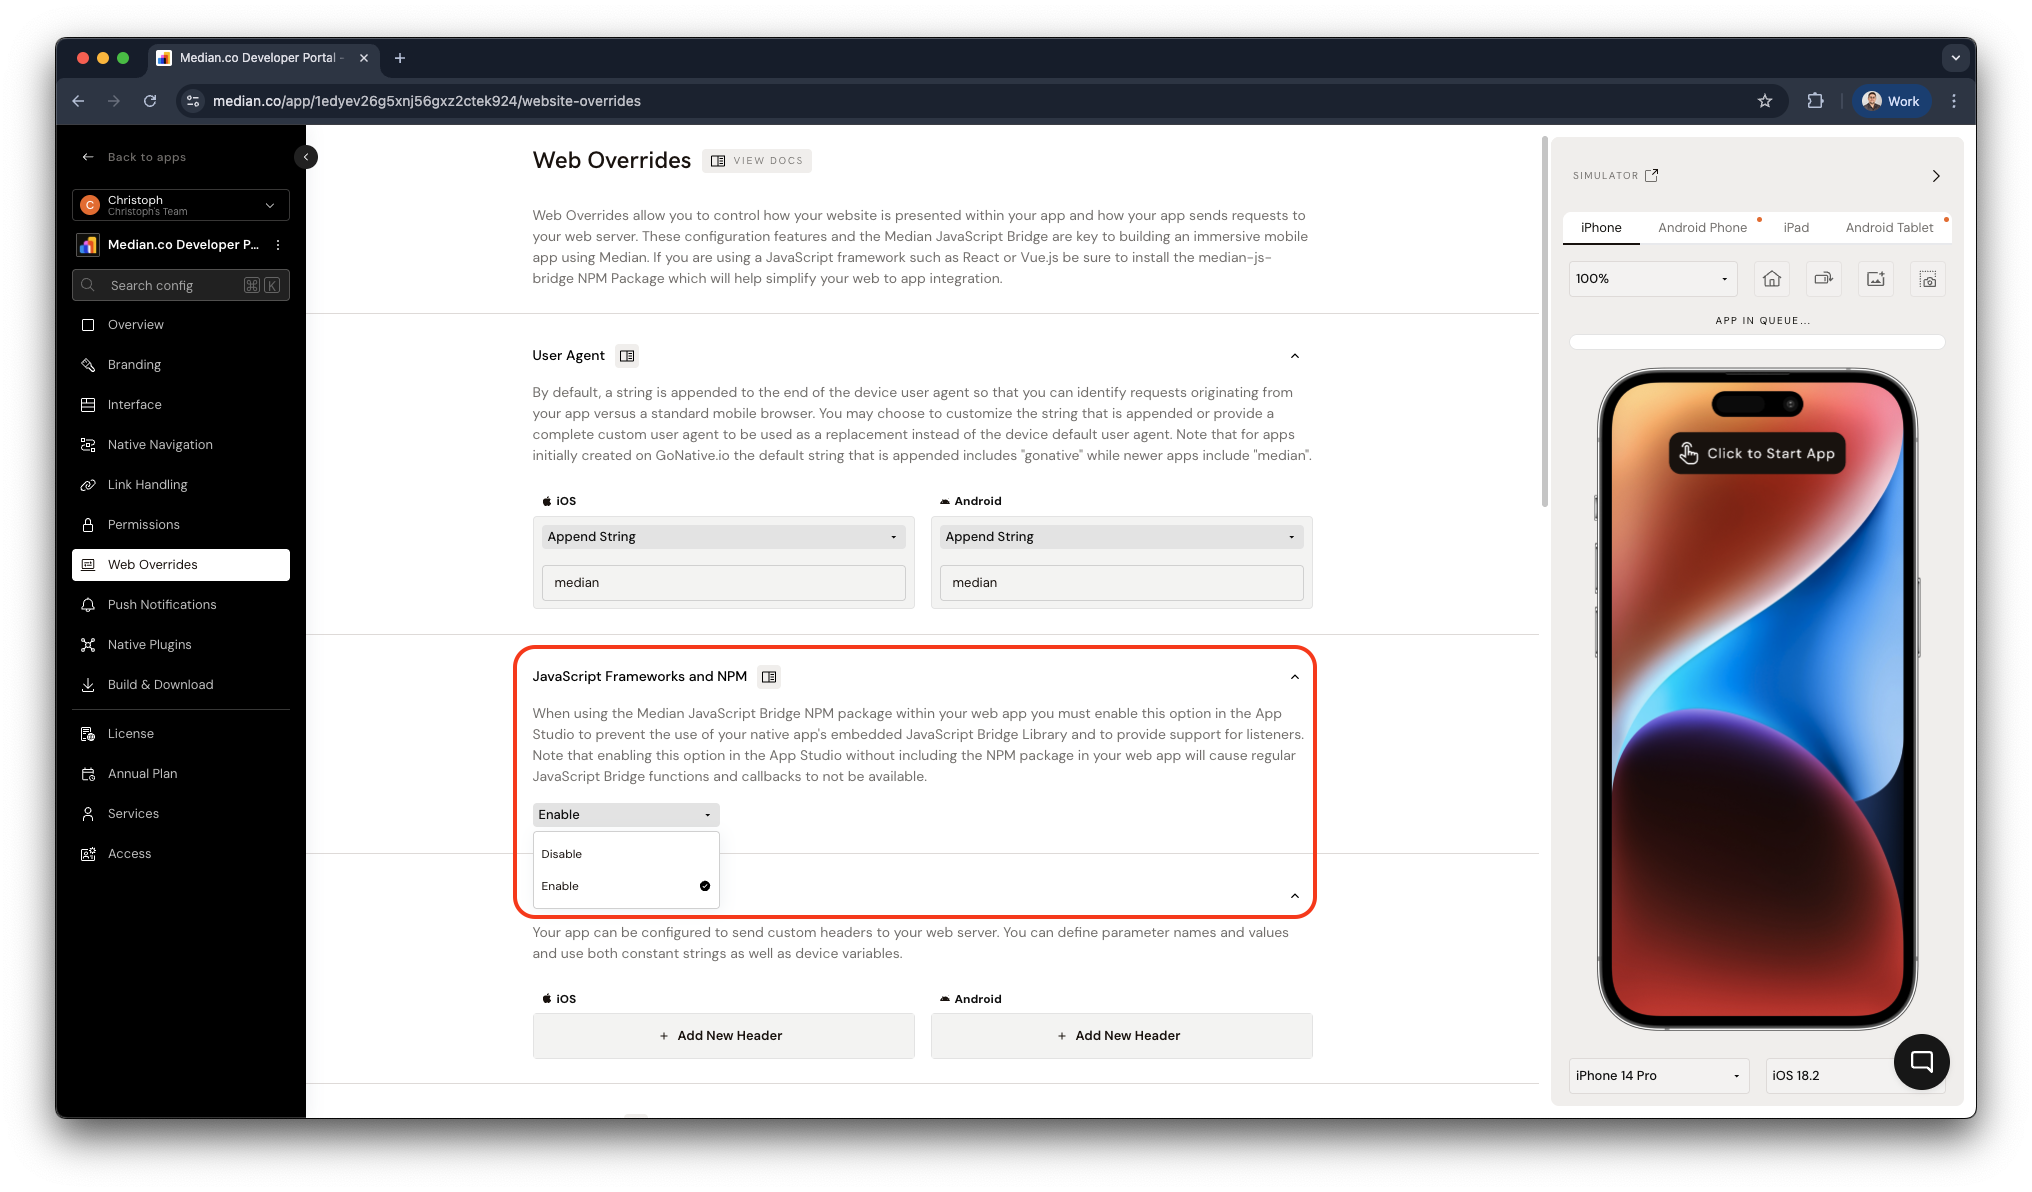
Median App Studio - JavaScript Frameworks and NPM
Once the AI installs the library, you'll have access to dozens of native mobile features. In the following sections, we'll show you exactly which prompts to use to add specific functionality like push notifications and haptic feedback.
Step 7: Detect mobile app usage
Before adding any native feature, your app must know when it's running inside the native mobile app versus a standard web browser.
Why detection matters
Native features only work inside of your mobile app. If you (or Replit Agent) try to call a native feature like median.camera.takePicture() in a web browser, it will fail and likely crash your app. Detection lets you safely:
- Show or hide mobile-only buttons and features
- Provide different experiences for web users (like a standard file upload)
- Call our native APIs without errors
Prompt Replit Agent to add detection
To get started, open Replit Agent. Use the following prompt, which specifically requests the officially recommended detection method.
I am using Median.co to turn this web app into a native mobile app. Please create a global JavaScript helper variable or function named `isMedianApp`. This helper should check if `navigator.userAgent.indexOf('median') > -1`. I will use this variable to conditionally show mobile-only features.What Replit Agent will implement
Replit Agent will add detection code that looks similar to this:
// Detect if running in Median mobile app (official method)
const isMedianApp = navigator.userAgent.indexOf('median') > -1;

// You can now use this variable throughout your app
if (isMedianApp) {
  // Show mobile-only features
  // Call Median JavaScript Bridge APIs
  console.log('Running inside a Median native app!');
} else {
  // Show web-only features
  // Use web APIs instead
  console.log('Running in a web browser.');
}
Test your detection
- Open your Replit app in your normal desktop web browser. Open the developer console. You should see the message:
isMedianApp = false(or your console log "Running in a web browser."). - Build a test version of your app in the Median App Studio.
- Open your app in the Median simulator or on your mobile device. Check the remote console. You should see:
isMedianApp = true(or "Running inside a Median native app!").
Once detection works, you're ready to add other native features.
Updated 5 days ago
Next Steps
Congratulations! You've built your to-do app, set it up in the Median App Studio, and installed the JavaScript Bridge. Now you're ready to add powerful native mobile features.